

Download Google Drive for Mac Yosemite Updated
Download Google Drive for Mac Yosemite
Back in the solar day when nosotros bought Os X on discs, as long equally y'all kept that disc, y'all always had a bootable installer just in case. Modernistic, downloadable versions of Bone 10 create a recovery partition on your bulldoze, but it'south always a smart idea to make your own bootable installer drive too.
I recommend making 1 for Yosemite, on an external hard drive or USB thumb drive, for many of the aforementioned reasons I recommend making a bootable Mavericks installer drive: If you want to install Yosemite on multiple Macs, using a bootable installer drive tin can exist more user-friendly than downloading or copying the entire installer to each calculator. If you want to erase the bulldoze on a Mac before installing Yosemite, or start over at whatsoever time, you can use a defended installer drive to boot that Mac, erase its drive, and so install the Os clean and restore whatsoever data y'all need from a fill-in. And if your Mac is experiencing problems, a bootable installer drive makes a handy emergency disk.
Equally with previous versions of Bone 10, it's not difficult to create a bootable installer drive from the Yosemite installer, though the processes take changed slightly since Mavericks. I bear witness you how, beneath.
Keep the installer from being deleted
Similar all recent versions of OS X, Yosemite is distributed through the Mac App Store. Every bit with the Mavericks installer, if yous leave the Yosemite beta installer in its default location (in the principal Applications folder) when you install Os X 10.10, the installer volition delete itself later the installation finishes. If y'all program to use that installer on other Macs, or—in this case—to create a bootable bulldoze, exist sure to copy the installer to another drive, or at least move it out of the Applications folder, earlier you install. If y'all don't, you'll take to redownload the installer from the Mac App Shop before you lot tin can create a bootable installer drive.
Create the Yosemite install bulldoze: The options
I've come up with iii ways you can create a bootable Bone Ten install drive for the Yosemite: using the installer's built-in createinstallmedia tool; using Deejay Utility; or performing the Disk Utility process using Terminal.
The createinstallmedia method is the easiest; if y'all're at all comfy using Terminal, it'due south the arroyo that I recommend you try first. (Note that the createinstallmedia tool doesn't work nether OS X 10.half dozen Snow Leopard—it requires Os X x.7 Lion or later.)
The Disk Utility method is the way to go for people who are more than comfortable in the Finder (though it does require a couple Terminal commands), and it works under Snow Leopard, King of beasts, Mountain Lion, Mavericks, and Yosemite. The Disk Utility-via-Last arroyo is for the beat out junkies out at that place.
Whichever method you use, you demand a Mac-formatted bulldoze (a hard drive, solid-state bulldoze, thumb drive, or USB stick) that'due south big enough to hold the installer and all its data—I recommend at least an 8GB wink drive. That drive must besides be formatted with a GUID Partition Tabular array. (Follow this tutorial to properly format the drive.) Your Os X user account must as well have administrator privileges.
Starting with Mavericks, hidden inside the OS 10 installer is a Unix program called createinstallmedia, provided by Apple specifically for creating a bootable installer drive. If you're comfy using Terminal, createinstallmedia is a relatively simple tool to employ.
As mentioned above, the createinstallmedia tool works just in Lion, Mountain Lion, Mavericks, or Yosemite—y'all tin't create an installer drive this way while booted into Snowfall Leopard. If y'all need to create a Yosemite beta install bulldoze while booted into Snow Leopard, you lot should apply the Deejay Utility instructions, below.
Here are the required steps:
- Connect to your Mac a properly formatted 8GB (or larger) drive, and rename the bulldoze
Untitled. (The Concluding control used hither assumes the bulldoze is named Untitled.) Besides, make sure the Yosemite installer, chosen Install Bone Ten Yosemite.app, is in its default location in your primary Applications folder (/Applications). This means that if you moved it before installing Yosemite, you lot need to move it back earlier making your installer disk. - Select the text of this Terminal command and copy it:
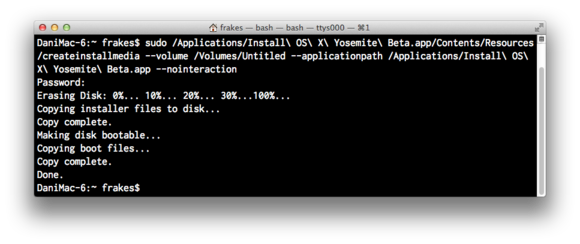
sudo /Applications/Install OS 10 Yosemite.app/Contents/Resource/createinstallmedia --volume /Volumes/Untitled --applicationpath /Applications/Install OS X Yosemite.app --nointeraction
- Launch Last (in /Applications/Utilities).
- Warning: This step will erase the destination drive or partition, so brand sure that information technology doesn't comprise any valuable data. Paste the copied command into Terminal and press Return.
- Type your admin-level business relationship password when prompted, and and so press Return.
- The Concluding window displays the progress of the process, in a very Terminal sort of fashion, by displaying a textual representation of a progress bar: Erasing Disk: 0%… 10 percent…twenty percent… and then on. The program then tells y'all it's copying the installer files, making the disk bootable, and copying kicking files. Await until you see the text Copy Complete. Washed. (come across the screenshot in a higher place), which could take as long as 20 or 30 minutes, depending on how fast your Mac can copy data to your destination drive.
You now have a bootable Yosemite install drive. If you like, you can rename the drive from its default name of Install OS X Yosemite, though I retrieve it's kind of a tricky name.
Selection 2: Apply Disk Utility
Yous'll find Deejay Utility, a handy app that ships with OS X, in /Applications/Utilities. Here are the steps for using it to create your installer drive. The procedure is a scrap more involved with Yosemite than it was for Mavericks (which was itself a bit more involved than nether Mount King of beasts and Lion).
- Once y'all've downloaded Yosemite, discover the installer on your Mac. It's called Install Os X Yosemite.app and it should accept been downloaded to your master Applications binder (/Applications).
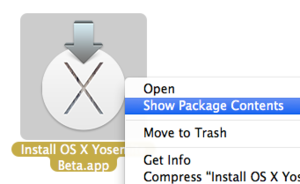
- Right-click (or Command+click) the installer, and cull Prove Parcel Contents from the resulting contextual menu.
- In the folder that appears, open Contents, then open Shared Back up; y'all'll run across a disk image file chosen InstallESD.dmg.
- Double-click InstallESD.dmg in the Finder to mount its volume. That volume will announced in the Finder as Os 10 Install ESD; open it to view its contents.
- Several of the files you'll need to piece of work with are hidden in the Finder, and you demand to make them visible. Open the Terminal app (in /Application/Utilities), then blazon (or re-create and paste) the post-obit command, and then press Return:
defaults write com.apple.finder AppleShowAllFiles 1 && killall Finder
(This tells the Finder to prove hidden files—we'll re-hibernate such files afterwards.) - Launch Disk Utility (in /Applications/Utilities) and then drag BaseSystem.dmg (in the OS 10 Install ESD volume) into Disk Utility's left-hand sidebar.
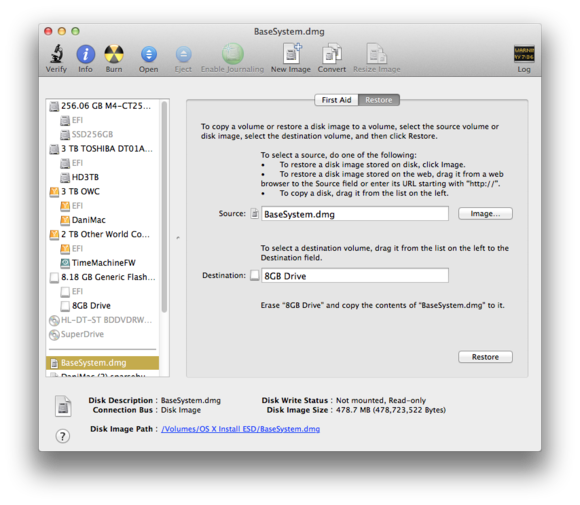
- Select BaseSystem.dmg in Deejay Utility's sidebar, and and then click the Restore button in the chief part of the window.
- Drag the BaseSystem.dmg icon into the Source field on the right (if it isn't already in that location).
- Connect to your Mac the properly formatted difficult drive or flash drive you desire to utilize for your bootable Yosemite installer.
- In Disk Utility, discover this destination drive in the left sidebar. You may see a couple partitions under the bulldoze: one named EFI and another with the name yous see for the bulldoze in the Finder. Drag the latter—the one with the bulldoze name—into the Destination field on the correct. (If the destination drive has boosted partitions, just drag the partition y'all desire to use every bit your bootable installer volume.)
- Alert: This pace volition erase the destination drive or division, and so make certain that information technology doesn't comprise whatever valuable information. Click Restore, and so click Erase in the dialog box that appears; if prompted, enter an admin-level username and password.
- Wait for the restore procedure to cease, which should have just a few minutes.
- Open the destination drive—the one you lot're using for your bootable installer bulldoze, which has been renamed OS X Base of operations System. Within that drive, open the Arrangement folder, and so open the Installation folder. You'll come across an alias chosen Packages. Delete that alias.
- Open the mounted Os X Install ESD volume, and you'll come across a folder called Packages. Elevate that folder into the Installation folder on your destination drive. (You're replacing the deleted Packages alias with this Packages folder.) The binder is about iv.6GB in size, and then the copy will take a bit of time, especially if you lot're copying to a tiresome thumb drive.
- Also in the mounted OS X Install ESD volume, you'll observe files named BaseSystem.chunklist and BaseSystem.dmg. Copy these files to the root (pinnacle) level of your install bulldoze (Os X Base Organization, not into the System or Installation folder).
- Eject the OS X Install ESD book.
- Yous'll likely want to re-hibernate invisible files in the Finder. Open up the Terminal app, type (or copy and paste) the post-obit command, and and so press Return:
defaults write com.apple.finder AppleShowAllFiles 0 && killall Finder
Y'all now have a bootable Yosemite install drive. If yous like, you can rename the drive from OS X Base of operations System to something more than descriptive, such equally Yosemite Installer.
Option 3: Use Final
If y'all're a Terminal jockey, you likely know that most of Disk Utility'due south features can be accessed using crush commands—which means that you can perform the Disk Utility procedure using a few commands in Terminal.
- Download the Yosemite installer from the Mac App Store and make sure it's in your main Applications binder (/Applications)—it'south called Install Bone X Yosemite.app.
- Connect to your Mac a properly formatted 8GB (or larger) drive. Rename the drive to
Untitled. (The Terminal commands I provide hither assume the drive is named Untitled.) - Open Final and type (or copy and paste) the post-obit commands, one past one, pressing return after each to run it. Make sure each control finishes—in other words, you lot see a command prompt—before running the next control. Enter your admin-level business relationship password when prompted.
sudo hdiutil attach /Applications/Install Bone X Yosemite.app/Contents/SharedSupport/InstallESD.dmg
sudo asr restore -source /Volumes/Bone X Install ESD/BaseSystem.dmg -target /Volumes/Untitled -erase -format HFS+
(During this step, you'll be prompted to confirm that you desire to erase the contents of Untitled. Typeyand press Return.)sudo rm /Volumes/Bone X Base of operations System/Arrangement/Installation/Packages
sudo cp -a /Volumes/Os 10 Install ESD/Packages /Volumes/Os X Base System/System/Installation/Packages
sudo cp -a /Volumes/OS X Install ESD/BaseSystem.chunklist /Volumes/OS X Base Organisation
sudo cp -a /Volumes/Bone X Install ESD/BaseSystem.dmg /Volumes/OS 10 Base Organisation
hdiutil detach /Volumes/Os X Install ESD
You at present have a bootable Yosemite install bulldoze. If you similar, yous tin can rename the drive from its default proper name of Bone X Base Organisation to something more descriptive, such equally Yosemite Installer.

Booting from the installer drive
Whichever of the higher up processes you've used, you tin now kick any Yosemite-compatible Mac from the resulting drive: Just connect the drive to your Mac and either (if your Mac is already booted into OS X) choose the install drive in the Startup Disk pane of System Preferences or (if your Mac is currently shut down) hold downwards the Option cardinal at startup and choose the install drive when Os X's Startup Manager appears.
When your Mac is booted from your installer bulldoze, you tin, of class, install the Bone, but y'all can too use any of the OS 10 installer's special recovery and restore features. Depending on how you fabricated your installer drive, when you kicking from that drive, y'all may even see the same OS X Utilities screen you get when you boot into OS X Recovery (recovery mode). However, unlike with recovery way, your bootable installer includes the unabridged installer.
Note: When you purchase something after clicking links in our articles, nosotros may earn a small-scale commission. Read our affiliate link policy for more than details.
Download Google Drive for Mac Yosemite
Posted by: marvinpoempon.blogspot.com
0 Response to "Download Google Drive for Mac Yosemite Updated"
Post a Comment